It's not optimised for 1:1 or any other magnification for that matter.
The original application of the Rodenstock lens is for a photographic enlarger, ie. where you would blow up (enlarge, magnify) a photographic negative (film) up to whatever size of photographic paper you wanted to use, which could very well be 1:1 but typically (much more often) not.
When we call a 1:1 magnification "normal" we are really just defining what the word "normal" means (it means a 1:1 ratio), rather than describing the ratio. It's a reference ratio. It's a way to make the mathematics easier to do. One speaks of "normalising" the magnification, which is to say: to assume a 1:1 magnification. By doing this we can then alter the normalised magnification in some equation to obtain what other magnifications would otherwise give us. The designation of 50mm as the focal length (on the lens I have) is also a "normalised" focal length. It is what the focal length would be if the lens was focused at infinity. This does not mean the lens is optimised for 50mm (or focus at infinity). It is just a reference value. It is from such a reference value we can then vary the focal length (away from 50mm) and work out where the focus would be for other focal lengths.
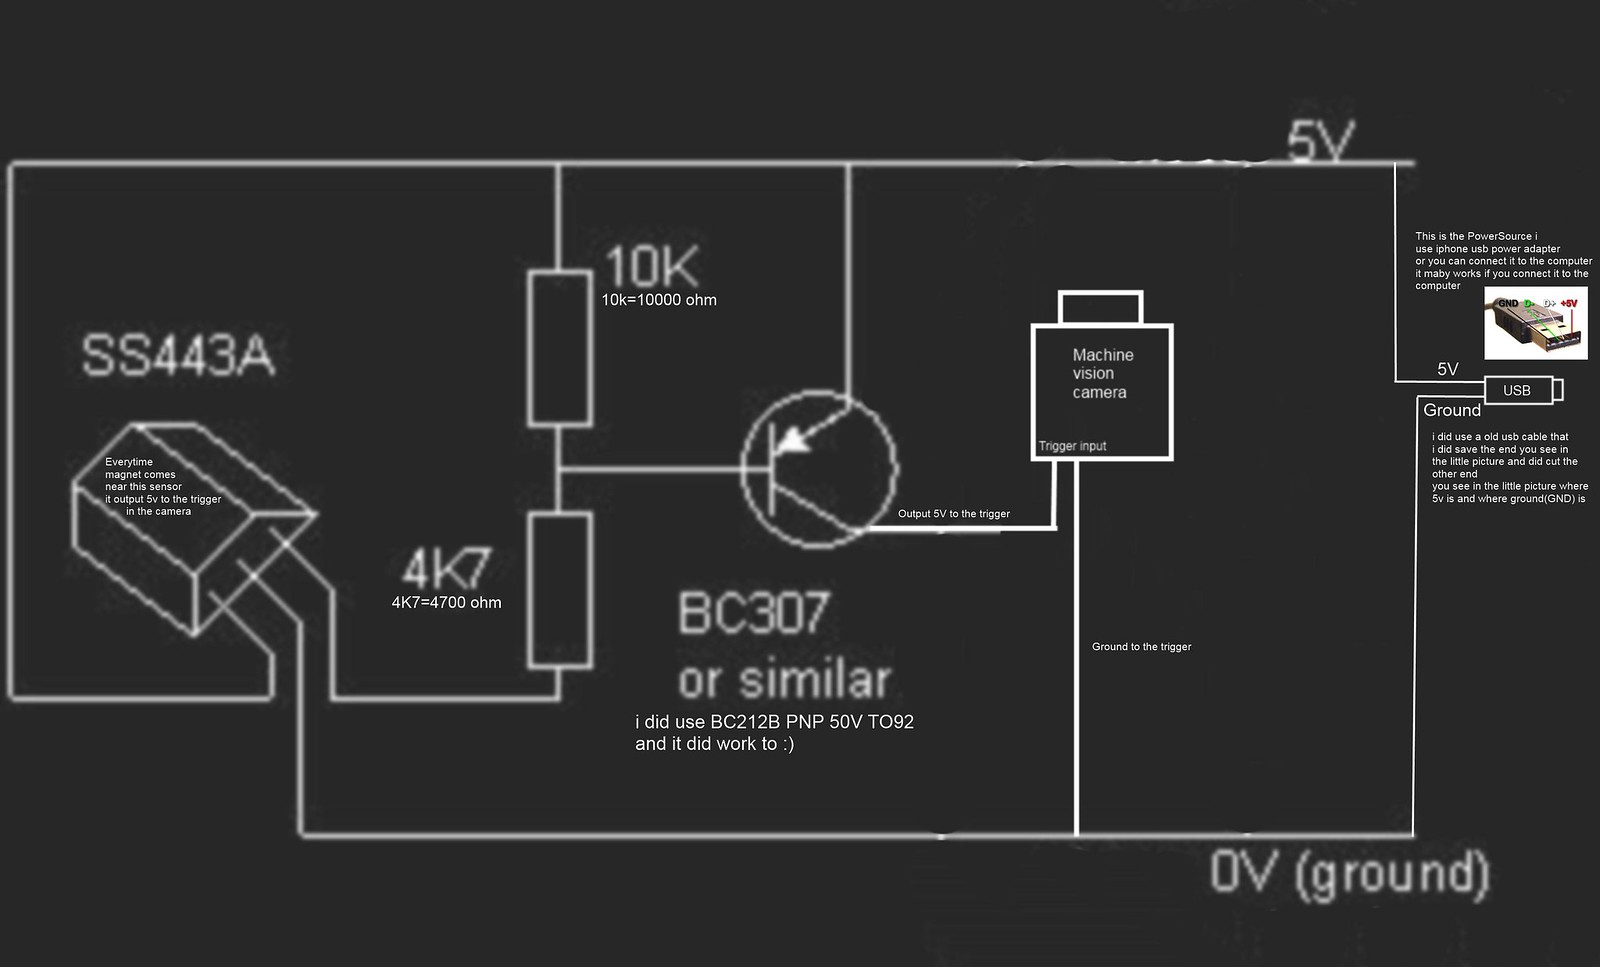
In a film transfer setup we are just replacing the photographic paper with a photographic sensor. Using the lens is not unlike using the lens of a Super8 projector, except we're projecting the film onto a sensor instead of a wall. And like a projector we would move the projector (film/lens) back and forth with respect to the wall in order to vary the size of the image on the wall (or on the sensor). Or move the wall! And we would vary the film to lens distance to adjust focus.
However they are inter-dependant, ie. changing focus also changes the magnification by a certain amount and vice versa, so it makes it a little tricky. You can't just lock off one distance and vary the other. You have to vary both distances by different amounts to get (or maintain) a particular magnification and/or focus. Typically, of course, the only focus we are interested in is the one which produces an "in focus" image.
So you vary the lens-to-film distance, as much as the lens-to-paper (or lens-to-sensor) distance, to find the specific magnification and focus you are after. Now there will be mathematical equations involving the lens focal length and film/sensor sizes that would determine exact distances to use in order to obtain a particular magnification/focus result, but eyeballing trial-and-error results on a suitably adjustable rack (as you are doing, and I'm also doing) is the conventional method. It is a what-you-see-is-what-you-get (WYSIWYG) methodology.
The maths comes in useful when you want to design a setup without having to go through such a trial-and-error process. Of course, if you make a mistake in your maths (which is easy to do) you won't see it. The benefit of making a "mistake" in reality is that it's both visible and not actually a mistake!
The main benefit of an APO lens (and similar lens) is not any particular magnification for which they would be designed, but that they correct for chromatic and spherical aberration - which is just that all the more important when working at the very small scales we are working.
http://en.wikipedia.org/wiki/Apochromat
C